Plex’s hardware-accelerated streaming feature is great for running a very efficient Plex media server. Because of this feature, you don’t need to get a server with tons of CPU headroom for media transcoding. Instead, you can let a GPU do the transcoding in hardware. If you are running your Plex server in a virtual machine however, you need to somehow give the VM direct access to the transcoding hardware. On an Intel-based system, you can simply pass the integrated GPU through to the Plex VM. Depending on the CPU model/generation, you can then use the iGPU to transcode anything up to 4k HEVC/h.265 content.
You can, however, no longer use the iGPU for the hypervisor. This means that your hypervisor now has no way of outputting video. At least not if your Plex VM is running. Instead, any display connected to the machine will show the video output from the virtual machine. This is usually not a problem during everyday operation. But it can become somewhat of a hassle when troubleshooting an issue with your hypervisor.
Introducing: Intel Graphics Virtualization Technology (GVT)
All 5th generation (Broadwell) to 10th generation (Comet Lake) Intel Core as well as Xeon E3 v4 CPUs support Intel’s Graphics Virtualization Technology. One variant of this technology suite (called GVT-g) allows you to “split” an Intel integrated GPU into multiple virtual GPUs. Using this feature, you can not only add hardware acceleration to more than virtual machine. It also allows you to keep the video output from your hypervisor, since it will always have access to part of the iGPU.
Enabling PCI passthrough and GVT on Proxmox
Step 1: Log into your Proxmox node via SSH or open a shell via the web gui.
Step 2: Use a text editor to open your GRUB config file (for systemd-boot please refer to the Proxmox PCI passthrough guide).
nano /etc/default/grubStep 3: Find the line that starts with GRUB_CMDLINE_LINUX_DEFAULT.
Step 4: Add intel_iommu=on and i915.enable_gvt=1 to the list parameters, for example:
GRUB_CMDLINE_LINUX_DEFAULT="quiet intel_iommu=on i915.enable_gvt=1"Step 5: Save the config changed and then update GRUB.
update-grubStep 6: Reboot the Proxmox node.
Step 7: After rebooting, login via SSH or open a shell via the web gui again.
Step 8: Validate your changes. If this command does not result in any output, then something went wrong.
dmesg | grep -e DMAR -e IOMMUStep 9: Use a text editor to add the following modules to /etc/modules.
# Modules required for PCI passthrough
vfio
vfio_iommu_type1
vfio_pci
vfio_virqfd

# Modules required for Intel GVT
kvmgt
exngt
vfio-mdev
Step 10: Save your changes and reboot.
Adding the mediated/virtual GPU to the virtual machine
Step 11: Once the node has booted back up, open a command line (SSH/web shell) one more time.
Step 12: Find the PCI address of the iGPU.
lspci -nnv | grep VGAThis should result in output similar to this:
00:02.0 VGA compatible controller [0300]: Intel Corporation UHD Graphics 620 (Whiskey Lake) [8086:3ea0] (rev 02) (prog-if 00 [VGA controller])Here, the PCI address of the iGPU is 00:02.0. Make note of that address.
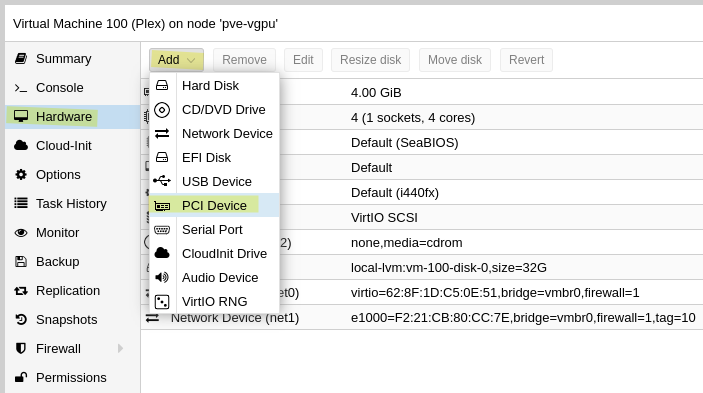
Step 13: Open the web gui and navigate to the Hardware tab of the VM you want to add a vGPU to.
Step 14: Click Add above the device list and then choose PCI Device.

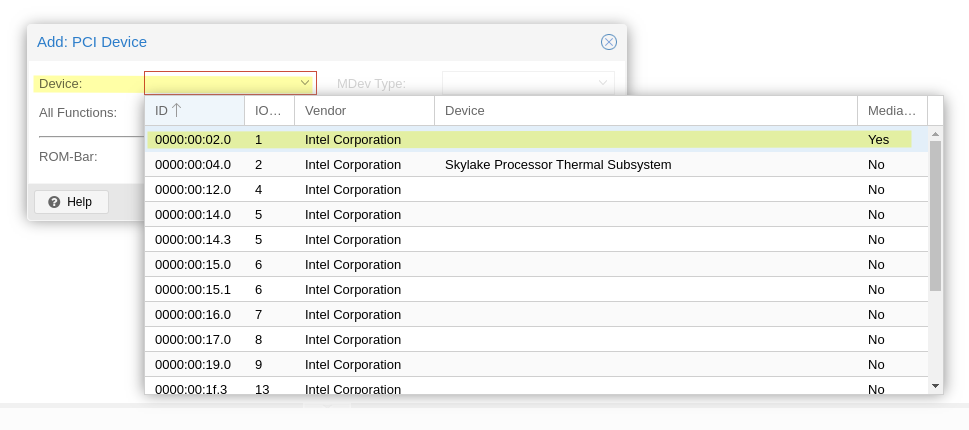
Step 15: Open the Device dropdown and select the iGPU, which you can find using it’s PCI address. Note that this list uses a different format for the PCI addresses, 00:02.0 is listed as 0000:00:02.0.

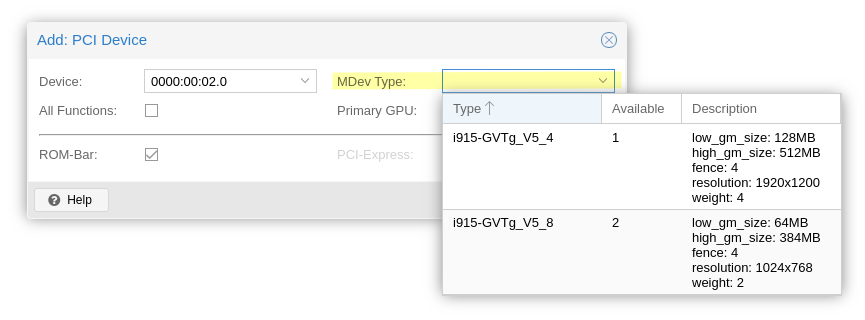
Step 16: Select the desired MDev Type. The listed resolutions only refers to the maximum screen resolution in the VM. They have no effect on the hardware transcoding capabilities.
I could not really find a performance difference between the “bigger” i915-GTVg_V5_4 and “smaller” i915-GTVg_V5_8 type when it comes to hardware transcoding. Unless you plan to use both instances of the i915-GTVg_V5_8 type, I would simply go with i915-GTVg_V5_4.

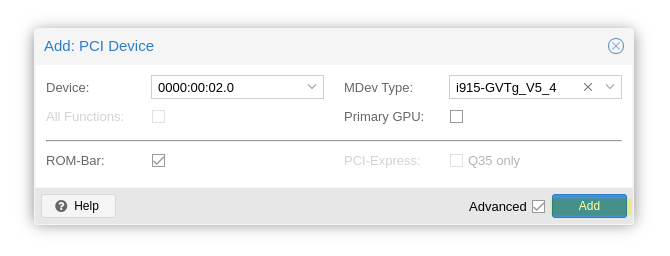
Step 17: Click Add.
Note: If you just want to use the vGPU for hardware acceleration, you do not need to tick the Primary GPU option. Keep in mind that if you do set it as the primary GPU, the Proxmox console will most likely no longer work.

Step 18: (Re-)Start your virtual machine.
Step 19: In your Plex server’s settings, tick Use hardware acceleration when available and Use hardware-accelerated video encoding in the Transcoder section.
And you’re done!
Your Plex server VM can now use hardware encoding as well as decoding via the mediated GPU. And your Proxmox server still has video output.

