I had used AWS Glacier for my backup efforts for about two years before finally get fed up with the low speeds and constant errors of the command line tool I used (“mt-aws-glacier”). I somehow became aware of rclone, another command line tool that claims to be the “rsync for cloud storage”. For me, it ticked all the boxes: It is actively being developed and improved, it supports multiple concurrent transfers and it is easy to use and well documented. Also, rclone supports encrypting data before uploading it to the cloud. However, even though rlcone supports many different cloud storage services, it does not support AWS Glacier. Looking at the list of supported services, I decided to go with Backblaze’s B2 cloud storage. It’s $0.005 per GB per month and I “knew” Backblaze from their hard drive stats, which they publish on a quarterly basis.
Let’s set it up
Step 1: Install rclone
$ curl https://rclone.org/install.sh | sudo bashStep 2: Create your B2 bucket you want to back up to (if you haven’t yet)
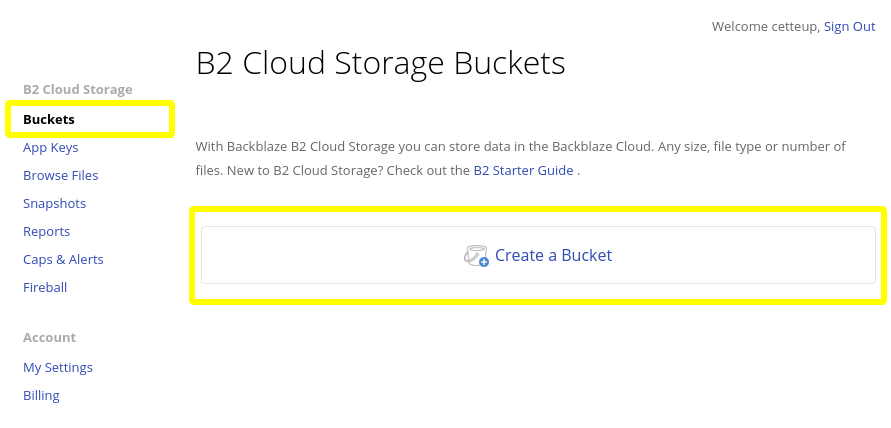
After signing into your Backblaze account, go to “Buckets” and then click “Create a Bucket”.
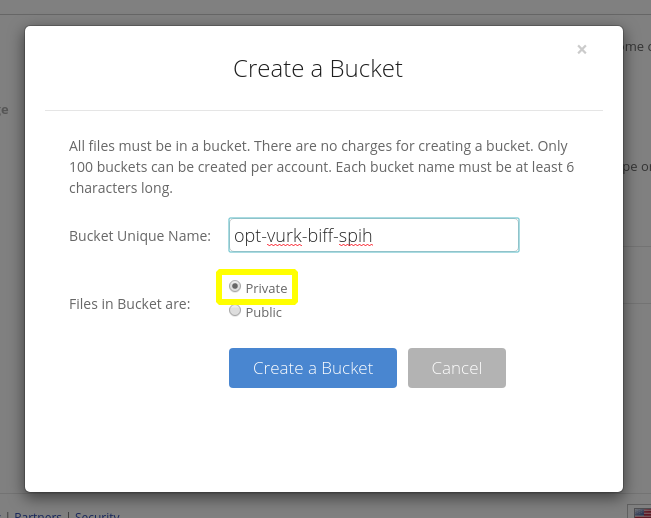
Give the bucket a unique name. I usually use random names, since they are less likely to already be in use by someone else. Make sure to keep the files set to “Private”.
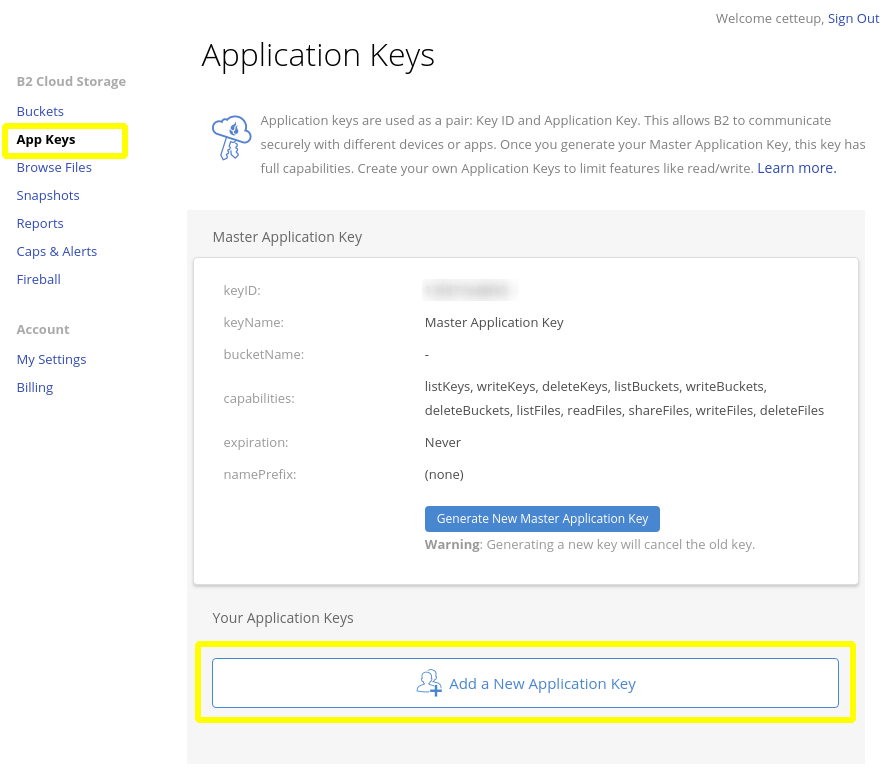
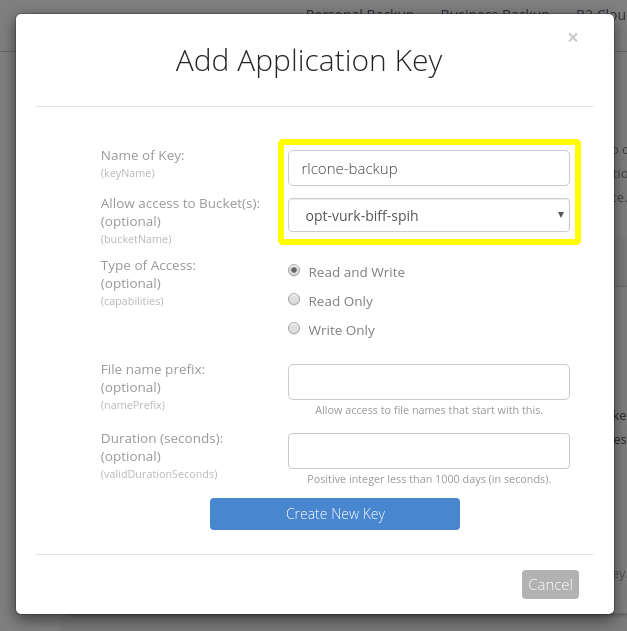
Next, create an application key. Go to “App Keys” and click “Add a New Application Key”.
Provide a name for your key. Also, it is usually a good idea to limit the key to only grant access to the relevant bucket. So, select the bucket you created from the bucket list. Please note that you cannot change any of the key settings later. You will need to create a new key and replace the old one.
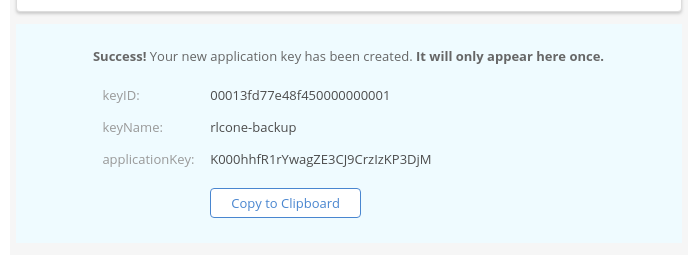
After creating the new application key, Backblaze will show you the key once. So make sure you keep this tab open and don’t navigate anywhere until you are done setting up your rclone config.
Step 3: Configuring rclone to access your new bucket
$ rclone configrclone will show you that can be considered the “main menu”. Enter “n” to create a new remote and hit enter.
$ rclone config
2019/12/15 15:05:07 NOTICE: Config file “/home/pi/.config/rclone/rclone.conf” not found — using defaults
No remotes found — make a new one
n) New remote
s) Set configuration password
q) Quit config
n/s/q> n
Enter a name for the new remote and hit enter. I usually go with something like “archive-b2”.
name> archive-b2Next, rclone asks you to select a type of storage. Enter “b2” and hit enter.
5 / Backblaze B2
   "b2"
[...]
33 / http Connection
    “http”
34 / premiumize.me
    “premiumizeme”
Storage> b2
Go back to your Backblaze browser tab, copy the application key id and paste it into the command line. Then hit enter.
Account ID or Application Key ID
Enter a string value. Press Enter for the default (“”).
account> 00013fd77e48f450000000001
Now, do the same with the application key.
Application Key
Enter a string value. Press Enter for the default (“”).
key> K000hhfR1rYwagZE3CJ9CrzIzKP3DjM
Almost done! rclone has one more setting: Whether to delete or simply hide files on the remote. I usually go with defaults by hitting enter (hard_delete: false). Not hard deleting files gives you an extra layer of “safety” in case you run a sync that accidentally deletes files on the remote. Finally, you are asked if you want to edit the advanced config. Enter “n” and hit enter once more.
Make sure the displayed config is correct. Then enter “y” and hit enter. If anything is incorrect, enter “e” and rclone will go through every option and ask you whether you want to change that option.
Remote config
 — — — — — — — — — —
[archive-b2]
type = b2
account = 00013fd77e48f450000000001
key = K000hhfR1rYwagZE3CJ9CrzIzKP3DjM
 — — — — — — — — — —
y) Yes this is OK
e) Edit this remote
d) Delete this remote
y/e/d> y
You are now back in the main menu. You might think we are done with the rclone config, but not quite. Since we want to use encryption, we need set that up next. rclone handles encryption by adding another remote “on top” of the first one. Thus, the underlying remote (“archive-b2”) will handle authentication towards the cloud storage while the other remote handles the encryption.
So, enter “n” again and hit enter.
Current remotes:
Name Type
==== ====
archive-b2 b2
e) Edit existing remote
n) New remote
d) Delete remote
r) Rename remote
c) Copy remote
s) Set configuration password
q) Quit config
e/n/d/r/c/s/q> n
Again, enter a name for the remote and hit enter. I usually simply append “-crypt” to the underlying bucket’s name. So I would use “archive-b2-crypt”.
name> archive-b2-cryptAs the storage type, enter “crypt” and hit enter.
10 / Encrypt/Decrypt a remote
    "crypt"
[...]
33 / http Connection
    “http”
34 / premiumize.me
    “premiumizeme”
Storage> crypt
Next, rclone asks you for the remote to encrypt/decrypt. As you might have noticed, we were not asked to provide the bucket name during the setup of the underlying remote. However, it is highly recommended to provide both the remote and bucket in this step. Thus, enter your underlying remote’s name followed by a colon and the bucket’s name. Then hit enter.
Remote to encrypt/decrypt.
Normally should contain a ‘:’ and a path, eg “myremote:path/to/dir”,
“myremote:bucket” or maybe “myremote:” (not recommended).
Enter a string value. Press Enter for the default (“”).
remote> archive-b2:opt-vurk-biff-spih
You are now asked to choose whether/how to encrypt filenames. Make sure to read the docs before choosing here, since the “standard” encryption for example requires filenames to be less then 143 characters long. I usually decide against encrypting filenames, since I mostly backup files who’s names don’t contain any relevant details about the file. Keep in mind that the files themselves will be encrypted either way.
Enter the number/name of your desired option and hit enter.
How to encrypt the filenames.
Enter a string value. Press Enter for the default (“standard”).
Choose a number from below, or type in your own value
 1 / Don’t encrypt the file names. Adds a “.bin” extension only.
  “off”
 2 / Encrypt the filenames see the docs for the details.
  “standard”
 3 / Very simple filename obfuscation.
  “obfuscate”
filename_encryption> off
Next, decide whether you want to encrypt directory names. Again, I usually don’t bother. Once again, consult the docs for details about the options, then enter the name/number of your choice and hit enter.
Option to either encrypt directory names or leave them intact.
Enter a boolean value (true or false). Press Enter for the default (“true”).
Choose a number from below, or type in your own value
 1 / Encrypt directory names.
  “true”
 2 / Don’t encrypt directory names, leave them intact.
  “false”
directory_name_encryption> false
Now we finally get down to setting up the password/pass phrase for the encryption. Enter “y” and hit enter to provide your own password.
Password or pass phrase for encryption.
y) Yes type in my own password
g) Generate random password
n) No leave this optional password blank
y/g/n> y
Make sure to choose a secure password that you can either remember of store in a safe location (e.g. a password manager of your choice). rclone does not store the password in plain text in the config, so you won’t be able to (easily) recover it from there.
Enter/paste your password and hit enter. You won’t be able to see the password you entered but you will need to confirm it by entering it again.
Enter the password:
password:
Confirm the password:
password:
Now, repeat those steps in order to provide a password/pass phrase for salt. Be sure not to use the password/pass phrase you just used.
Password or pass phrase for salt. Optional but recommended.
Should be different to the previous password.
y) Yes type in my own password
g) Generate random password
n) No leave this optional password blank
y/g/n> y
Enter the password:
password:
Confirm the password:
password:
Finally, rclone will display a summary of the new remote’s settings. Make sure everything looks fine, enter “y” and hit enter.
Remote config
 — — — — — — — — — —
[archive-b2-crypt]
type = crypt
remote = archive-b2:opt-vurk-biff-spih
filename_encryption = off
directory_name_encryption = false
password = *** ENCRYPTED ***
password2 = *** ENCRYPTED ***
 — — — — — — — — — —
y) Yes this is OK
e) Edit this remote
d) Delete this remote
y/e/d> y
And we’re done with the config. You should see your two new remotes listed above the “main menu”.
Current remotes:
Name Type
==== ====
archive-b2 b2
archive-b2-crypt crypt
e) Edit existing remote
[...]
Enter “q” and hit enter in order to exit the config mode.
s) Set configuration password
q) Quit config
e/n/d/r/c/s/q> q
Step 4: Testing the setup
Before attempting to sync/copy any data to the encrypted remote, you can test your setup by simply touching a file on the remote. Be sure to only use the crypt remote from here on, since you’d be uploading the data unencrypted if you used the non-crypt remote.
$ rclone touch archive-b2-crypt:/test.fileIf this command results in any errors, either copy the error message into your search engine of choice or repeat the setup process. If the command ran successfully (it did not output anything), verify that the file was written to the remote by running:
$ rclone ls archive-b2-crypt:/
   0 test.file
You should get something similar to the above output. In case you want to verify that your data actually is encrypted before the upload, choose a non-sensitive test file and copy it to the remote.
$ rclone copy Documents/file-with-known-content.txt archive-b2-crypt:/Now, download that file via the web interface and make sure that you cannot read it’s contents. If you can read the file, make sure you used the crypt remote and not the underlying remote in the copy command.
Once your done testing, remove any test files. Please note that this command will empty the remote, so do not run it if you have already uploaded any “real” data. Remember that we told rclone to only hide files rather than actually deleting them? Since we really want to delete the test files, we need to use the --b2-hard-delete flag.
$ rclone delete archive-b2-crypt:/* --b2-hard-deleteIn the future, you can remove hidden files with the cleanup command. Be sure to do this on a somewhat-regular basis as well as after syncs with a large number of deletions.
$ rclone cleanup archive-b2-crypt:/And we’re done!
rclone is set up and tested. You can now use it to copy or sync data to your encrypted remote. You find details about the differences between sync and copy as well as details on all the other command in rclone’s excellent documentation. The docs also explain the many different flags you can use to further control how rclone behaves.
Things to do next
- run your sync/backup on a regular basis (how to coming soon)
- run your sync/backup as a system user (how to coming soon)
