Amazon recently announced that the unlimited storage plan for it’s Cloud Drive will be discontinued. The new plans cost 99.99€ per terabyte per year. Since I had my entire Plex media library backed up to my unlimited storage Amazon Cloud Drive, I needed to find a similarly cheap alternative. Amazon Cloud Drive used to cost me 70€ per year for unlimited storage. Now it would cost me 199.98€ per year, since I have about 1.4 terabyte to store. I started looking for cheaper alternatives and quickly settled on AWS Glacier, a cheap solution for my backup needs at just 0.0045$ per gigabyte per month (region EU Frankfurt) plus $0.060 per 1,000 upload requests.
Let’s do some quick napkin-math for year one
Required upload requests (splitting files into 16MB parts): 87,500
Upload costs: 5.25$
Storage costs: 75.6$
Total costs: ~80$ (plus tax)
So, Backing up to AWS Glacier will cost me about 80$ or 68€ (plus tax) per year compared to Amazon Cloud Drive’s 199,98€ per year. I will therefore go ahead and move my backup to the Glacier. Note: AWS Glacier is not designed to be an easily accessible cloud storage solution but rather a cold storage backup that you do not need to access apart from restoring in case of a failure. You can find out more in the AWS Glacier FAQ.
Let’s set it up
After a little bit of duckduckgo-ing I found a project called “mt-aws-glacier” on Github that should work on my Plex server running Ubuntu Server. Unfortunately, the installation via PPA does not work for Ubuntu 16.04, forcing me to install this manually (as explained on the project site).
Step 1: Install required packages
sudo apt-get install libwww-perl libjson-xs-perlIf you are using Ubuntu 18.04 instead of 16.04, your system might not able to find thelibjson-xs-perl package. In that case, add the following to your /etc/apt/sources.list:
deb http://de.archive.ubuntu.com/ubuntu bionic main universeStep 2: Clone the git repository
If you want to have the aws client output timestamps in the console and logs, use the modified client I made instead of the original version (timestamp format is %Y-%m-%d %H:%M:%S as in 2018–02–11 11:55:21).
Clone the original version:
sudo git clone https://github.com/vsespb/mt-aws-glacier.git /etc/aws-glacierOr for using my modified client:
sudo git clone https://github.com/cetteup/mt-aws-glacier.git /etc/aws-glacierStep 3: Add mtglacier as a system wide command
sudo ln -s /etc/aws-glacier/mtglacier /usr/bin/mtglacierStep 4: Create a config- and a journal-directory
sudo mkdir /etc/aws-glacier/config.d /etc/aws-glacier/journal.dStep 5: Set up your config
sudo nano /etc/aws-glacier/config.d/my-backup.cfgYou need to/can set the following parameters:
key (required)
Your AWS account/user key
secret (required)
Your AWS account/user secret
region (required)
Region of your AWS vault
protocol (optional, defaults to http)
Protocol to use for transfer
dir (required)
Path of directory to back up
vault (required)
Name of vault to back up to
journal (required)
Path of journal file to use (the journal keeps track of what was uploaded etc.)
concurrency (optional, defaults to 4)
Number of concurrent uploads
partsize (optional, defaults to 16)
Size of file chunk to upload at once
You might need to adjust the concurrency and partsize parameters based on your computer’s performance and that of your internet connection. I tested this on a 10MBit/s upload connection and kept getting errors using a partsize of 16MB. Reducing that to 8MB with 2 concurrent uploads worked much, much better. But since my actual server has a 100MBit/s upload connection I stuck to the defaults for these parameters for my final config.
This is what my final config looks like:
key=***
secret=***
region=eu-centra-l
protocol=https
dir=/media/plex
vault=my-backup
journal=/etc/aws-glacier/journal.d/my-backup.journal
Step 6: Test your config
You can test your setup with the below command. Due to the --dry-run flag in the command, mtglacier will show you what would be done without actually transferring any data.
sudo mtglacier sync --dry-run --config /etc/aws-glacier/config.d/my-backup.cfg --newIf you get any errors, check your config and make sure that it contains all required parameters. In case the only output you get is mtglacier: command not found, make sure you did not skip step 3.
Step 7: Prepare a logging directory
sudo mkdir /var/log/aws-glacierStep 8: Run your first sync
sudo bash -c 'mtglacier sync --config /etc/aws-glacier/config.d/my-backup.cfg --new >> /var/log/aws-glacier/sync.log'It will take quite a while for this to complete (depending on your internet connection and the amount of data).
Step 9: Setting up regular syncs
I want my server to sync my media once per day since I will be adding new media from time to time. Therefore I need to create a new cron job.
Note: You might not want to permanently run the backup as root. Check below under improvement #1 to see how to do this for a more permanent setup.
sudo crontab -eAnd enter the following:
30 15 * * * /usr/bin/mtglacier sync --config /etc/aws-glacier/config.d/my-backup.cfg --new >> /var/log/aws-glacier/sync.logThis will run the sync every day at 15:30 (3:30 pm). You learn more about cron jobs here, in case you want to change the time or frequency of the job for your setup.
And we’re done (with the basic variant)
This is a pretty rudimentary setup, but it works. You might want to improve upon this by running the backup as a non-root user (see below) or by adding log rotation — just to name two examples.
Improvement #1: Running backup as non-root
Running this backup task usually should not require root privileges. Thus you might want to run in as a different user that we will create just for this purpose. You will need some basic knowledge of linux user/group permissions in order to make use of this.
Step 1: Create a new user
We will add a new user called “awsglacier”. Since this user does not need to log in we will create him as a system user and tell the system to not create a home folder. I will create my user in the plex group, since it is meant to back up my Plex library. You might need to change the group based on your setup.
sudo adduser --system --ingroup plex --no-create-home awsglacier
Step 2: Adjust permissions
The new user will need the following permissions:
- read permission for directory we want to back up
- read permission for our config
- read/write permission for the journal
- read/write permission for the logfile
- execute permission for the mtglacier script
Step 2.1: Read permission for directory we want to back up
Let’s get started with the permissions for our source directory. Those consist of two parts: the permission to execute commands on subdirectories (in order to list contained files for example) and the permission to read files. Please note that this part is highly dependant on your setup. I will show you what needs to be done for my setup but I cannot cover every possible scenario.
First, make sure your group owns the source directory:
sudo chown -R plex:plex /media/plex
Then set permissions for subdirectories:
sudo find/media/plex-type d -exec chmod 755 {} ;
Finally, set permissions for the files:
sudo find/media/plex-type f -exec chmod 644 {} ;
Step 2.2: Read permission for our config
Our config is currently owned by root. Since the file contains our AWS key and secret we will not want everybody to be able to read it. Thus, we change the owner and set the required permissions (read permission for our user, no permissions for anyone else). If we need to change the config later, we will do so as root.
sudo chown awsglacier:plex /etc/aws-glacier/config.d/my-backup.cfg
sudo chmod 400 /etc/aws-glacier/config.d/my-backup.cfg
Step 2.3: Read/write permission for the journal
We need to set similar permissions as we just did for the config here, but the user will also have to have write permission in order to update the journal.
sudo chown awsglacier:plex /etc/aws-glacier/journal.d/my-backup.journal
sudo chmod 600 /etc/aws-glacier/journal.d/my-backup.journal
Step 2.4: Read/write permission for the logfile
The logfiles contain the name of every file that has been uploaded, deleted, ignored, etc. by the backup script. Therefore, you might not want everybody to be able to read it. We will once again simply change the owner of the file and deny anyone but our user to access the file. If we need to check the log, we will have to do so as root. Please note that you will need to adjust these settings if you want to use log rotation of some sort.
sudo chown awsglacier:plex /var/log/aws-glacier/sync.log
sudo chmod 600 /var/log/aws-glacier/sync.log
Step 2.5: Execute permission for the mtglacier script
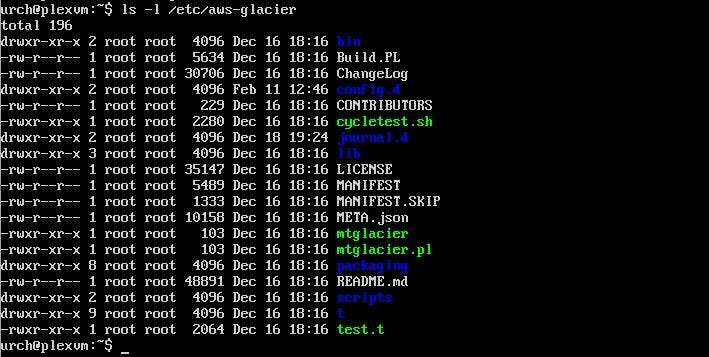
Last but not least, our user needs to able to execute the script. The script itself does not contain any valuable information so you can simply allow anyone to execute it. The required permissions should already be set (since Ubuntu would set them this way by default). You can make sure by running
ls -l /etc/aws-glacier
The output should look like this:

Step 3: Setting up regular syncs with our user
Just like we did in the basic version, we will need to add a cron job. This time however, we will add it for our awsglacier-user rather than for root.
sudo crontab -u awsglacier -e
And enter something like this:
30 15 * * * (cd /etc/aws-glacier;./mtglacier sync --config config.d/my-backup.cfg --new >> /var/log/aws-glacier/sync.log)
This will run the sync every day at 15:30 (3:30 pm).
Improvement #2: Adding log rotation
We set our sync up to run every single day. Since details of each of those syncs is written to the same file, that file will steadily grow and it will become cumbersome to find log entries for a specific day. In order to fix/avoid that, we can add log rotation using logrotate (which is installed by default on any buntu system).
Step 1: Create a logrotate config for the sync logs
We first need to add a logrotate config that controls when and how logs are going to be rotated.
Start by opening a text editor with a new file.
sudo nano /etc/logrotate.d/aws-sync
Then enter your config. You can use the config below or come up with your own. If you’re not familiar with the config options, check out the man page.
/var/log/aws-glacier/*.log {
     daily
     missingok
     rotate 90
     compress
     delaycompress
     notifempty
     create 0644 awsglacier plex
     dateext
     dateyesterday
     dateformat -%Y-%m-%d
     extension .log
     olddir /var/log/aws-glacier/archive
}
This config tells logrotate to rotate logs daily, that 90 logs should be kept and that files should have the date of their entries added rather than just numbers. I won’t go into detail explaining what each option does. If you are unfamiliar with any of them, go ahead and check out the man page. However, here’s what your folder structure would look like after a few days (today is July 23rd 2018).
/var/log/aws-glacier
  sync.log
  archive/
    sync-2018-07-20.log.gz
    sync-2018-07-21.log.gz
    sync-2018-07-22.log
Feel free to change the config if this folder structure does not fit your needs.
Step 2: Test your config
You can test your config by running logrotate manually. If you don’t have any log files yet, this will basically just test the syntax. Otherwise you will get a detailed explanation on what will be done with each file.
sudo logrotate -d /etc/logrotate.d/aws-syncIf you already ran the sync on the day your are adding the log rotation, your output should look similar to this.
reading config file /etc/logrotate.d/aws-sync
extension is now .log
olddir is now /var/log/aws-glacier/archive
Reading state from file: /var/lib/logrotate/status
Allocating hash table for state file, size 64 entries
Handling 1 logs
rotating pattern: /var/log/aws-glacier/*.log  after 1 days (90 rotations)
olddir is /var/log/aws-glacier/archive, empty log files are not rotated, old logs are removed
considering log /var/log/aws-glacier/sync.log
  log does not need rotating
The gist of it is: Our only log file does not need to be rotated since it was last changed today.
Sources:
- https://github.com/vsespb/mt-aws-glacier
- https://blog.lausdahl.com/2014/05/using-amazon-glacier-on-linux/
- https://www.digitalocean.com/community/tutorials/an-introduction-to-linux-permissions
- https://stackoverflow.com/a/11512211
- https://linux.die.net/man/8/logrotate
Update 2019-12
Due to issues with and low transfer speeds of the mt-aws-glacier script, I have since switched to using rclone to sync to Backblaze’s B2 storage (rclone does not support Glacier). You can find out how to set that up here.
